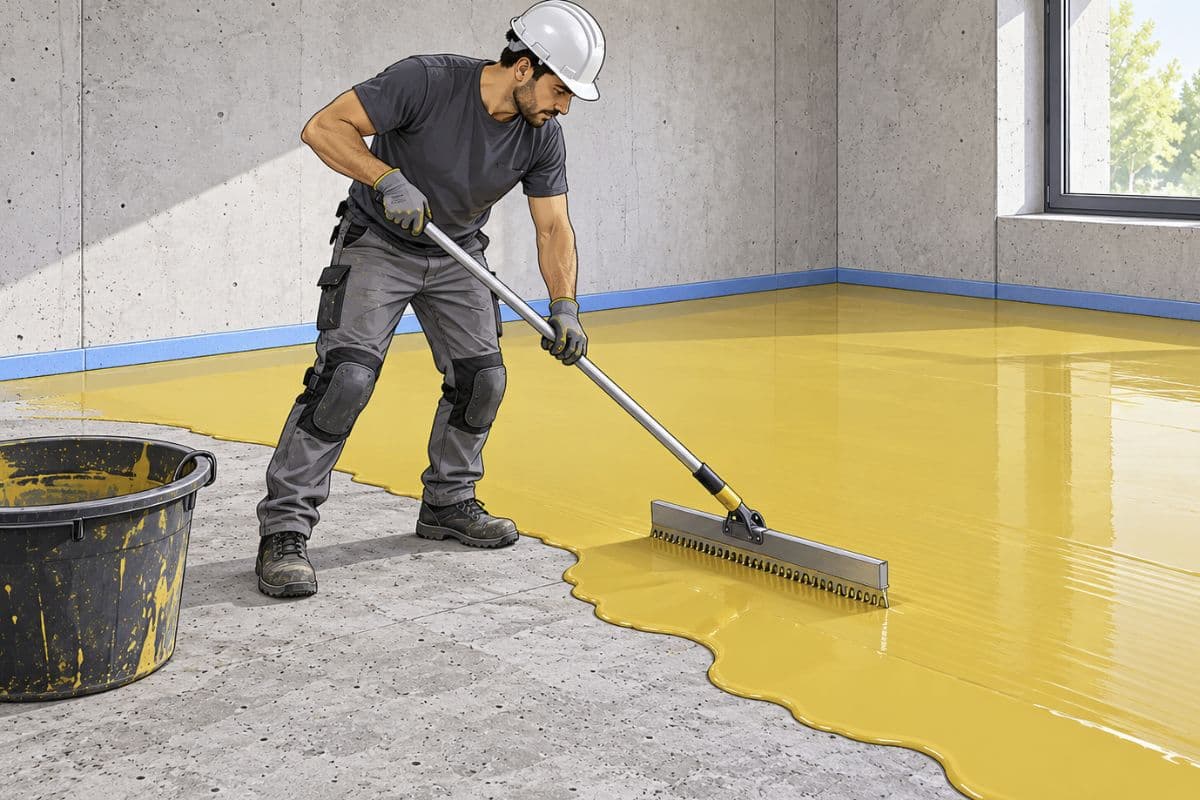
Self-leveling concrete
In construction and rehabilitation, one of the most practical ways to leave a floor leveled and smooth before placing a final coating is to use the so-called self-leveling concrete (also known as leveling paste or self-leveling mortar).
Its application on site is not complex, but for a quality finish, we do need to be clear about some data and understand its execution on-site.
Before buying the self-leveling mortar, measure the floor, define the finish, and review the technical sheet to avoid surprises!
Quick summary:
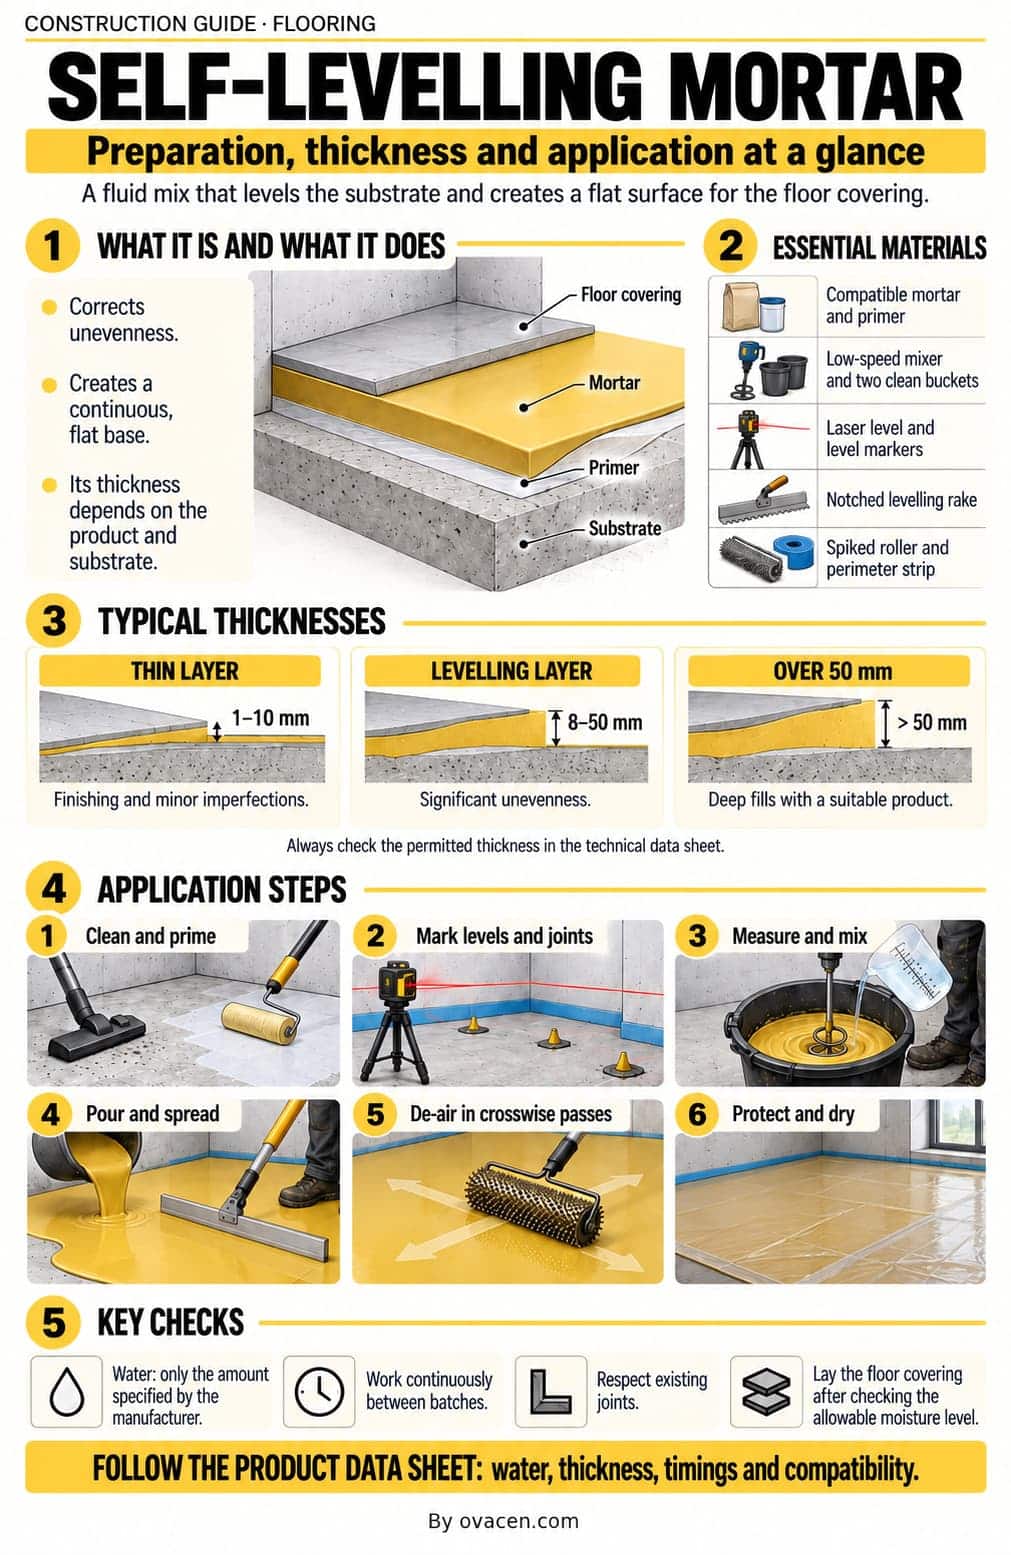
- The self-leveling concrete is a fluid cementitious coating (CT) or calcium sulfate (CA) that self-levels by gravity, forming a flat surface on which the final pavement is placed.
- The leveling paste is classified into thin layer (1 – 10 mm) and thick layer (>10 mm up to 50 mm) and for large unevenness (>50 mm) which is usually applied in two layers, poured 3 to 4 cm.
- The standard consumption ranges between 1.4 and 2.0 kg/m² per mm of thickness; a 25 kg bag yields ≈ 1.5–1.8 m² at 10 mm.
- Market price is not cheap: from approximately 8 € to 49.59 € per 25 kg bag (2026), depending on the type and features.
- Suitable for underfloor heating, screed rehabilitation, leveling corrections, and as a base for parquet, vinyl, carpet, or ceramic.
First, let’s see which self-leveling cement to choose, what thickness you need, and how to calculate the bags before starting. Then we will review tools, support preparation, and application steps…
What is self-leveling concrete and what is it for
Self-leveling mortar is an industrial product formulated with special cements (Portland or calcium aluminate), fine-grained aggregates (crushed marble, silica, or quartz), fluidizing additives, retarders, and optionally, reinforcing fibers, used for screeds and leveling floors.
Once mixed with water, it presents a very fluid consistency that allows it to spread by gravity and create a horizontal and smooth surface quickly.
🟧 Note: According to the technical definition of ANFAPA (National Association of Mortar Manufacturers), it is a “fluid mortar for screeds and leveling floors that is applied in a fresh state and self-levels, needing to be covered later by a coating”.
Its function on site is to regularize the base before placing the pavement. A quality finish requires a leveled floor to avoid irregularities
We can use it in screed rehabilitation, leveling corrections, and as a base for parquet, vinyl, carpet, ceramic, or natural stone. Also in underfloor heating systems using a specific product.
Composition and materials
Self-leveling concrete is made with a special blend. The primary binder is Portland cement or gypsum. Fine quartz sand provides a smooth surface. Polymers, such as superplasticizers and cellulose ethers, are added to help the mixture flow.
The composition of quality self-leveling mortar, according to technical sheets from manufacturers like Aymarsa or Grupo Puma, contains:
- Portland cement (EN 197-1): 25–35% by mass.
- Crushed marble or silica aggregates (EN 12620 / EN 13139): 55–65%, maximum grain size 0.1–2.5 mm.
- Organic and inorganic additives: superplasticizers (polycarboxylates), setting retarders, air entrainers, and accelerators.
- Polymeric fibers (in fiber-reinforced versions): improve crack resistance.
- Mixing water: 18–20% over powder weight.
The powder density of these leveling pastes is usually 1.5–1.8 g/cm³ and the compressive strength at 28 days reaches C25–C35 (25–35 N/mm²) according to classification EN 13813.
Self-leveling concrete must comply with strict standards, such as EN 13813 and ASTM C1708. These standards evaluate flowability, strength, and setting time
How to choose self-leveling mortar
Before buying, three important things: what unevenness we want to correct, on what support we will work, and what pavement we will place afterward. Choosing only by the price of the bag can end up being expensive.
Do you need to smooth the surface or raise the floor?
Before choosing the product, check if you need to correct small irregularities or raise the floor level. They are different tasks:
- The thin layer leveling paste is used to correct small irregularities and prepare the surface.
- The thicker screed mortar is for tasks where we need to add more material to recover the floor level.
It’s not about adding more quantity! You have to check the minimum and maximum application thickness of the technical sheet.
🟧 Before buying, measure how much material you need to add in the highest and lowest areas of the support. The chosen product must accept those thicknesses according to its technical sheet.
In the next section, you will find thickness categories and product examples…
Cementitious or calcium sulfate
To choose between a cementitious self-leveling (CT) and a calcium sulfate (CA) one, it is advisable to check the conditions of the space and the compatibility of the complete system. The following classification allows identifying the binder and locating the other types of screed mortars.
| Code | Type | Characteristics | Typical application |
|---|---|---|---|
| CT | Cementitious | The most used; good mechanical resistance | Interior and exterior, all types of coatings |
| CA | Calcium sulfate (anhydrite) | Low shrinkage, great fluidity, not suitable for moisture | Dry interior, underfloor heating, large surfaces |
| MA | Magnesite | High thermal conductivity | Special industrial floors |
| AS | Asphalt mastic | Flexible, waterproof | Insulation under parquet or terraces |
| SR | Synthetic resin | High chemical and mechanical resistances | Food industry, chemical, hospitals |
The European standard UNE-EN 13813 (Resistances are also indicated) classifies screed and leveling mortars by their binder. Choosing the correct type is key to durability and compatibility with the final coating.
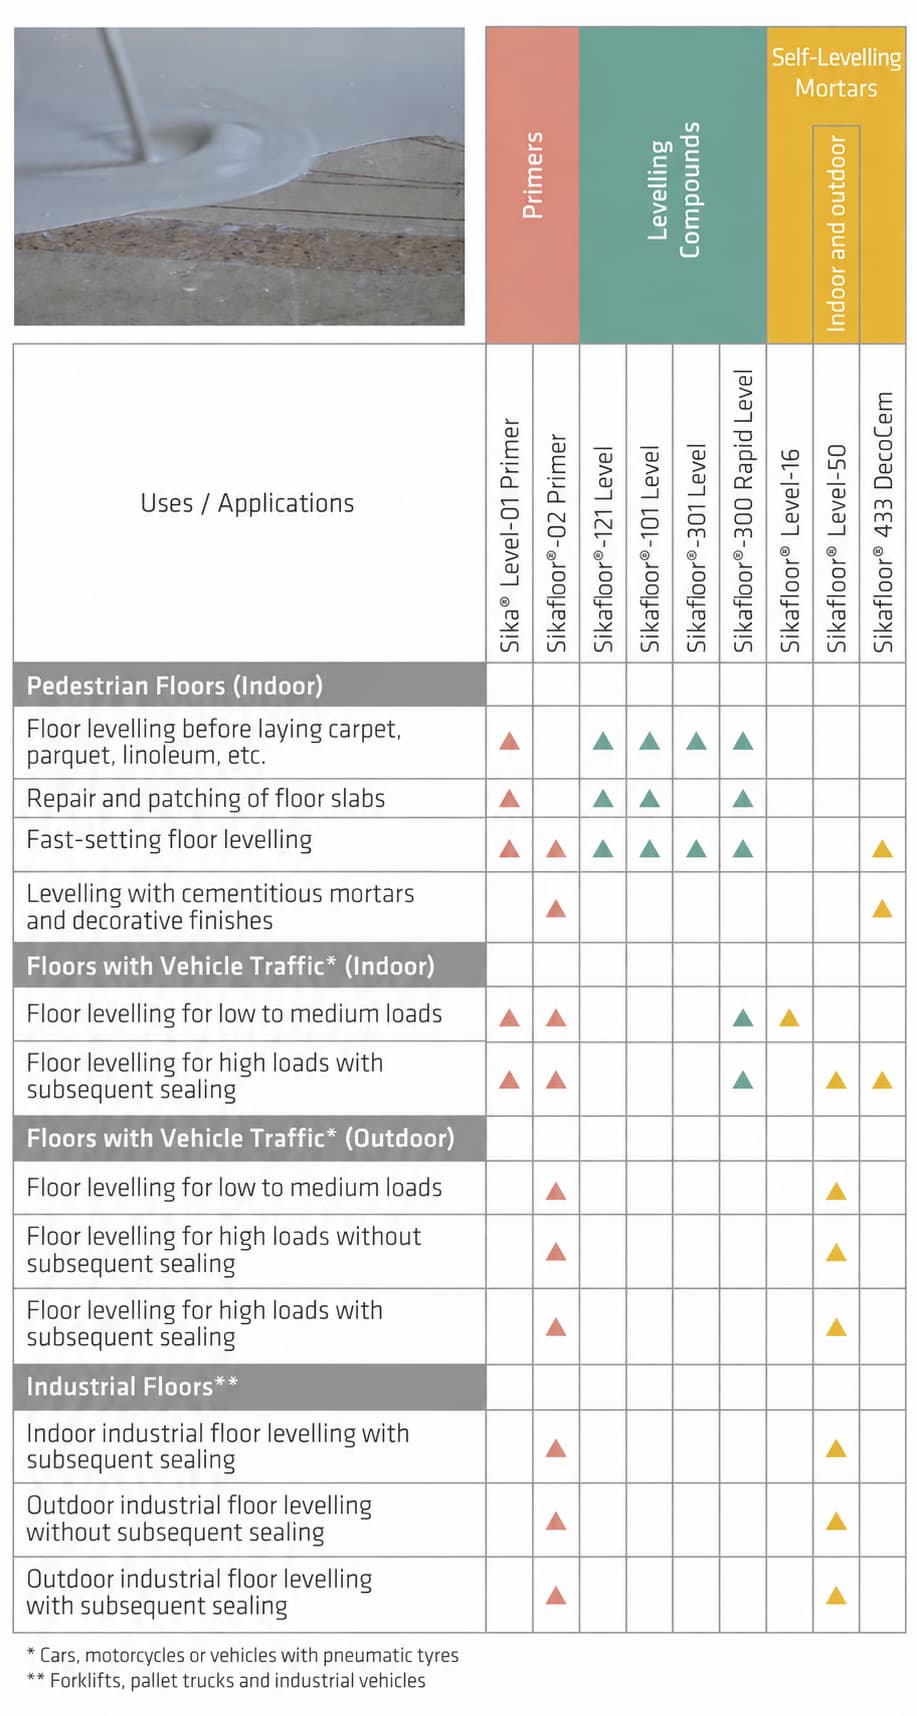
🟧 In residential work in Spain, in the majority of applications, CT types (cementitious) are used for their versatility and compatibility with all adhesives and finishes.
To see the variations of uses of cementitious self-leveling mortars, we leave you the following summary image from a technical catalog from Sika.
Compatibility with the support and the pavement
The self-leveling floor has to work with the original pavement, the primer, and the final coating. Before starting, check that the support is firm and check if it has dust, paint residues, grease, cracks, etc.
- According to the support: identify the base material and the compatible primer before buying.
- According to the pavement: review the installation conditions of parquet, laminate floors, vinyl, carpet, or ceramic and the requirements of the adhesive you will use.
- According to the space: confirm that the product admits the intended use, especially if there is moisture, underfloor heating, or traffic demands.
Can self-leveling cement be left exposed without any finish? I do not recommend it at all, even if it is for a garage or storage room, at least a coat of paint:
- Epoxy resin paint (2 components): For garages, workshops, storage rooms, commercial premises, or high-traffic areas.
- Polyurethane paint: Floors outdoors (terraces, balconies) or indoor areas with direct sunlight.
- Acrylic floor paint: For residential rooms, domestic storage rooms, or pedestrian traffic areas.
🟧 Advice: the technical sheet of the mortar and the instructions of the pavement must be reviewed together. That a surface can be walked on does not mean that we can already place any finish.
Brands of self-leveling mortars and recommended manufacturers
- Sika (Sikafloor Level): complete range, great availability in distribution.
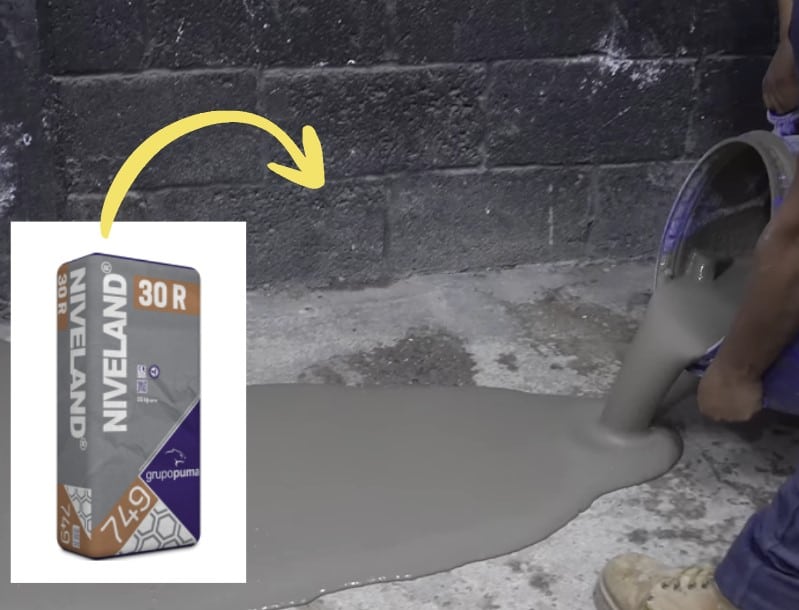
- Grupo Puma (Paviland Solera, Niveland): Spanish manufacturer with a wide catalog.
- Mapei (Topcem, Ultraplan): world leader, ideal for large works.
- Ardex (Nivelcem, K 80): ultra-fast setting, professional.
- Weber (Saint-Gobain) (Weberfloor): good quality/price ratio.
- BASF / Master Builders (Masterflow, Ucrete): high-end industrial.
- Capafloor (CAPA) and LevelPlus (Cemex): economical options for residential work.
As a recommendation, Sika, Weber, or Puma have good material and quality but with slightly higher prices than average, it’s worth it!
What thickness do you need to level the floor
The first step is to measure the floor and define the level we want to reach. Do not confuse the maximum unevenness of a point with the average thickness of the entire room: the latter will be used to estimate the material.
Remember that you have to take into account the height of the final pavement and the encounters with doors and adjoining rooms, look and measure everything well!
In the professional field, the thicknesses of self-leveling mortar can be identified as:
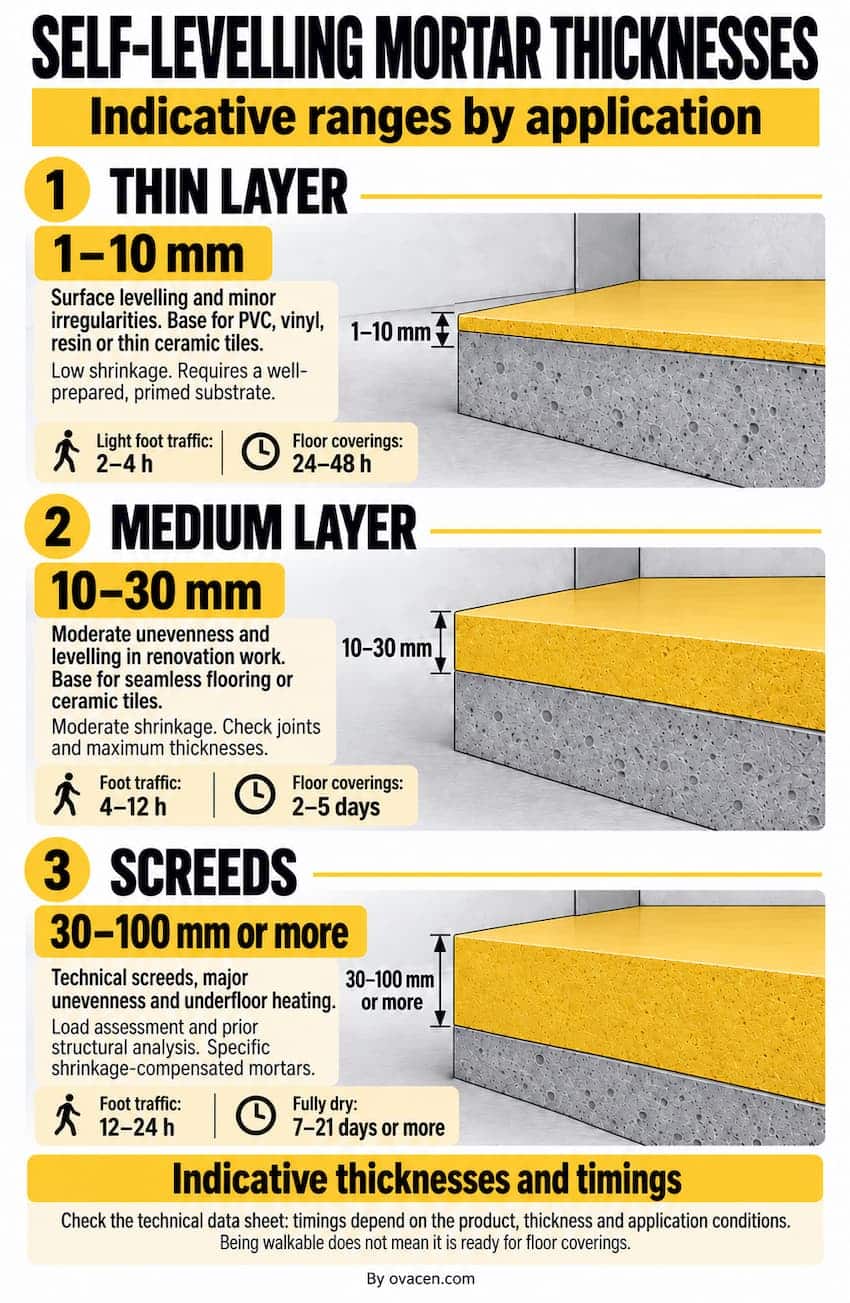
The recommendations according to the thickness of the self-leveling mortar (PDF in Spanish) are summarized in the following table:
| Category | Thickness | Applications | Limitations | Indicative times |
|---|---|---|---|---|
| Thin layer | 1–10 mm |
|
|
|
| Medium layer | 10–30 mm |
|
|
|
| Screeds | 30–100 mm or more |
|
|
|
⚠️ From experience, it is appropriate to apply in thicknesses above 50 mm in two layers (pours of 3 to 4 cm of leveling paste) but always check the manufacturer’s instructions.
How much material do you need and how much does it cost
To calculate the budget, we need to relate surface, average thickness, product consumption, and bag price. A cheaper bag does not necessarily imply a lower cost for the entire work.
Prices and performance of self-leveling cement (real data 2026)
The price of leveling pastes varies greatly in terms of quality and brand, some examples of prices for this 2026 are:
| Product (manufacturer) | Type | Bag | Thickness | Consumption | Approx. price |
|---|---|---|---|---|---|
| Capafloor 0–10 mm (CAPA) | CT fine | 25 kg | 1–10 mm | 1.4 kg/m²·mm | 15.50 € |
| Sikafloor 100 Level (Sika) | CT fine | 25 kg | 1–10 mm | 1.55 kg/m²·mm | 18.05 € |
| Capafloor 20–50 mm (CAPA) | CT thick | 25 kg | 20–50 mm | 2.0 kg/m²·mm | 7.73 € |
| Cemex LevelPlus Técnico 3–40 mm (Cemex) | CT medium | 25 kg | 3–40 mm | 1.9 kg/m²·mm | 13.90 € |
| Sikafloor Level 16 (Sika) | CT fast | 25 kg | 3–15 mm | 1.6 kg/m²·mm | 49.59 € |
| Nivelcem Plus (Ardex) | CT fast | 25 kg | 3–30 mm | 1.8 kg/m²·mm | 24.90 € |
🟧 Real table prices from different online platforms in Spain (Leroy Merlin, Bricomart, Bauhaus, etc) including VAT
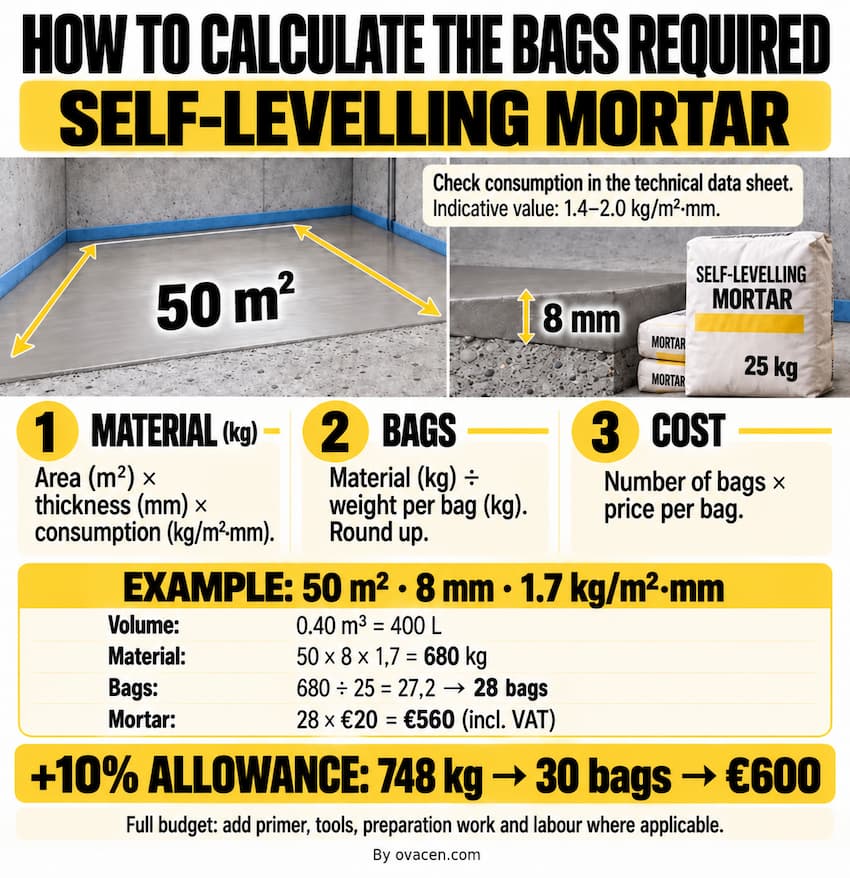
How to calculate the bags
Look for the consumption per square meter and millimeter of thickness in the product’s technical sheet. Then apply the following calculation:
- Material needed (kg) = surface (m²) × average thickness (mm) × consumption (kg/m²·mm).
- Bags needed = material needed (kg) / weight of each bag (kg), rounding up.
- Cost of the mortar = number of bags × price per bag.
The standard consumption ranges between 1.4 and 2.0 kg/m² per mm of thickness; a 25 kg bag yields ≈ 1.5–1.8 m² at 10 mm.
Self-Leveling Compound Bag Calculator
Enter your floor measurements and product details to estimate how much self-leveling compound to buy.
You need to buy
- Material before allowance
- Material including allowance
- Allowance applied
- Material purchased in whole bags
- Compound cost
The number of bags is rounded up after adding the waste allowance.
Calculation: floor area × average thickness × consumption × (1 + allowance / 100) ÷ bag weight. Estimates dry compound only; excludes water, primer, tools and labor. Check the manufacturer’s permitted application thicknesses. Measurements remain in m², mm and kg. Prices are entered in USD; no currency conversion is applied.
🟧 Note: You can use the square meter calculator HERE. Also, this calculation corresponds to the mortar. To prepare the complete budget, also count the primer, tools, preliminary work, and labor when necessary.
Budget example
Example of material calculation for a 50 m² room with an average unevenness of 8 mm (filling + finishing):
- Necessary volume: 50 m² × 0.008 m = 0.40 m³ = 400 liters
- Estimated consumption at 1.7 kg/m²·mm: 50 × 8 × 1.7 = 680 kg
- 25 kg bags needed: 680 / 25 ≈ 28 bags
- Total estimated cost (medium range): 28 × 20 € = 560 € (material only, with VAT)
I advise you to always add an extra 10% to compensate for losses due to mixing, pumping, and support absorption
Advantages and limitations of self-leveling mortar
✅ Advantages
- High flatness: results with very good leveling.
- Fast execution: 100–300 m²/day with pumping equipment.
- Easy to apply on small surfaces (Without specialized labor)
- Compatible with underfloor heating: wraps the pipes without leaving gaps.
- Good thermal conductivity in CT versions with specific additives.
- Surface ready quickly for pedestrian traffic and in 3–7 days for final coating.
- Different colors of self-leveling mortar. According to the manufacturer, there is a wide range of colors.
❌ Disadvantages
- Not a final finish: it should always be covered by a pavement, although in cases of warehouses, garages, etc., it is used as exposed and simply a coat of paint or epoxy resins is applied.
- Sensitive to moisture during setting (CT) and to water in service (CA).
- In large surfaces, specialized labor and several operators are needed (Some pouring the mortar and others performing the quick mixing)
- Requires prepared support: clean, firm, without dust, oil, or release agents.
- Higher price than traditional mortar (≈ approx 0.28 – 0.32 €/kg compared to 0.05 – 0.10 €/kg).
- Need to work quickly with the mortar: 20 – 35 minutes after mixing.
- Special care with mixing to avoid generating excess air bubbles.
Now comes the most interesting part… How is it applied?
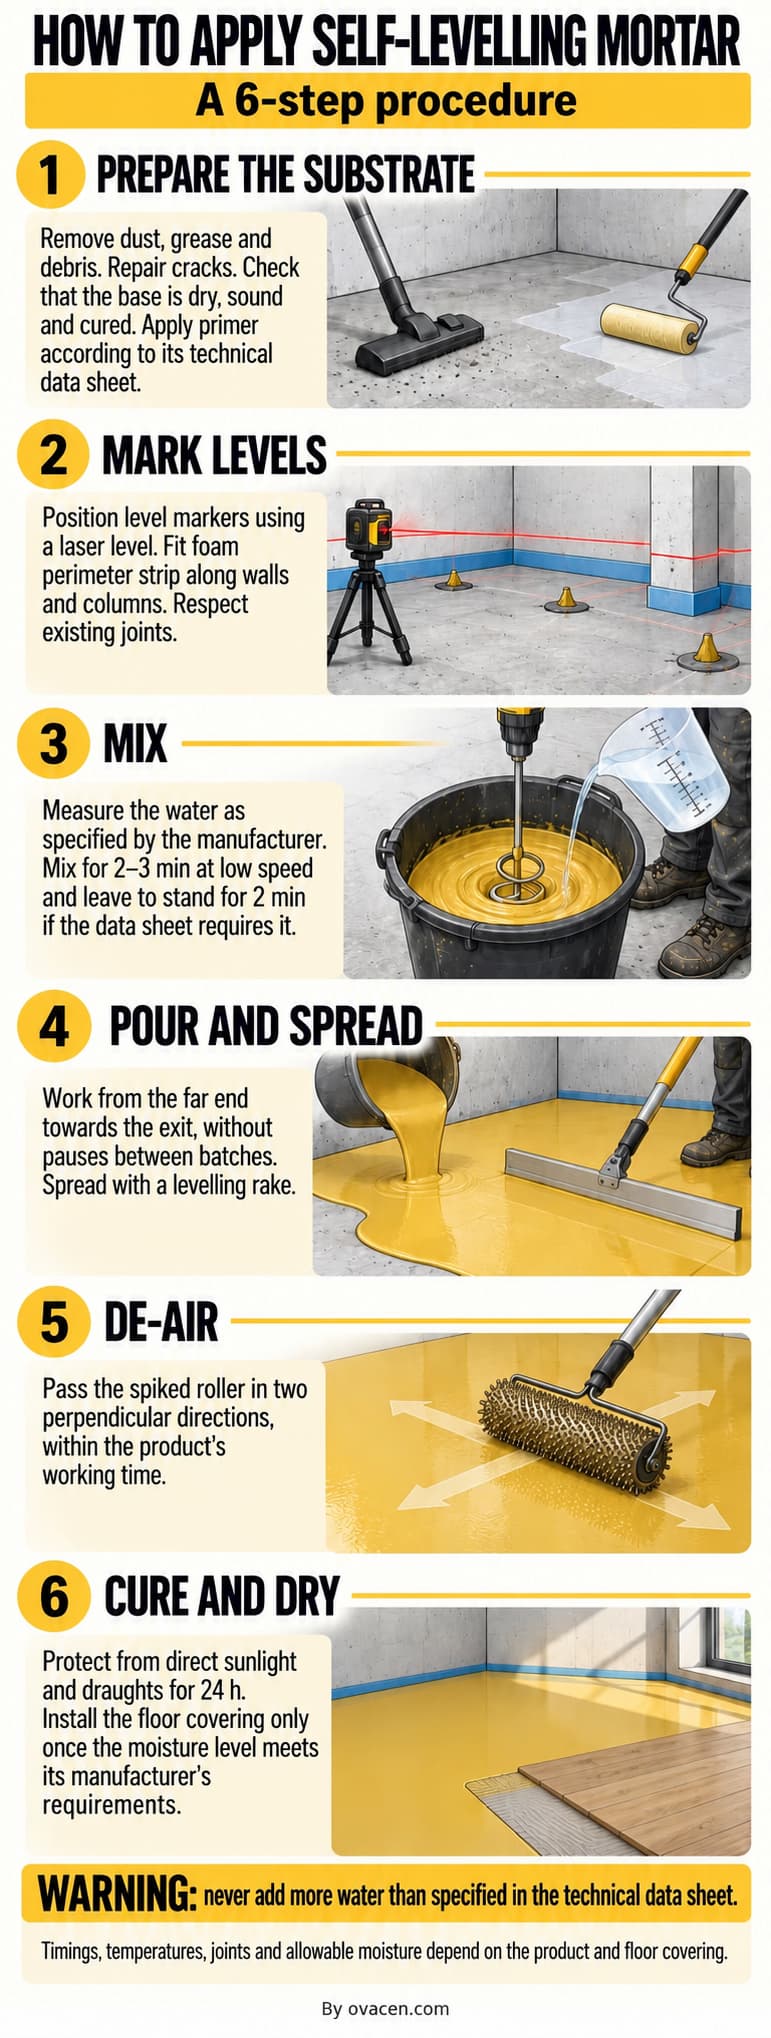
How to apply self-leveling mortar step by step
Once the product is chosen and the material calculated, it’s time to prepare the application. Organize the tools, mixing water, and work path before starting. During pouring, we need continuity, so it’s not advisable to start looking for utensils with the mixture already prepared.
Materials and tools
First, keep in mind that there are tool kits you can see HERE for laying self-leveling floors, they are useful! and you save a few euros. The complete list of elements we need is:
- Self-leveling mortar (Comes in 25 kg bags)
- Compatible primer (acrylic or epoxy resins) used as a bonding bridge between the base and the self-leveling mortar, my advice is that it must be applied!
- Low-speed electric mixer (300 – 500 rpm) or mortar pump
- At least three clean mixing containers. One for water, and two for mixing.
- Leveling screed or rake. There are adjustable ones according to need and it’s better than using a smooth metal trowel.
- Spiked roller (eliminates air bubbles)
- Spiked shoes to move and spread the slurry well
- Perimeter joint foam (thickness 5–10 mm)
- Marking tape, laser level, 2 m ruler
A good video explaining the process is the following from the specialized construction YouTube channel:
1. Prepare the support and apply the primer (24 h before)
- Remove dust, grease, paint, and construction residues. Remenber, temperature and humidity will affect flow, working time
and set time (Similar to cellular concrete). - Seal cracks with epoxy putty. Keep in mind that the surface where it is poured must be completely sealed.
- Verify that the support is set (> 28 days in new concrete), dry, and firm.
- Apply primer with a roller according to the manufacturer’s technical sheet (Better 2 coats, the first with more water to penetrate all pores and gaps, and then a second with less)
⚠️ The primer seals the pores of the original floor it must be applied! It prevents the support from absorbing the mortar’s water too quickly, thus avoiding ruining its setting. The dosage depends on the porosity. Always check the manufacturer’s sheet, and orientatively:
- Very porous supports: A first very diluted coat is applied (for example, 1 part product to 5 parts water) to penetrate deeply, followed by a second more concentrated coat (1:3).
- Polished or less porous supports: A more direct layer is sought (dilution 1:1) to create a rough surface that facilitates chemical bonding.
2. Mark levels and resolve joints
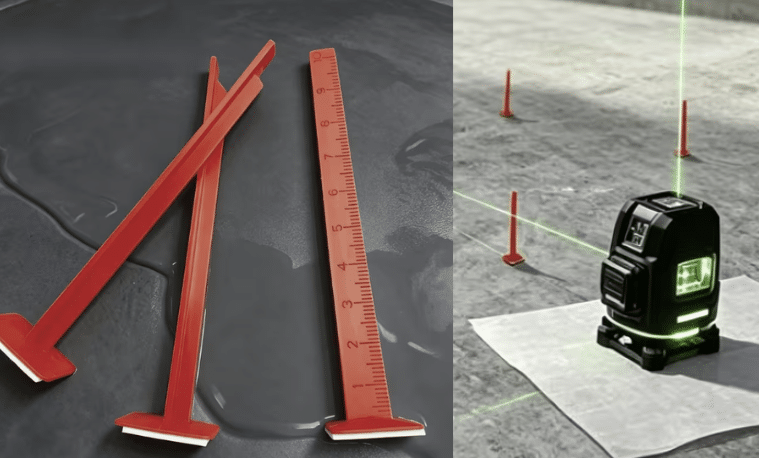
- Level markers are placed (such as stainless steel screws or adhesive plastic marks that are sold) guided with a laser level.
- Place perimeter joints of foam at all encounters with walls and pillars (6 mm width minimum and a depth between
10 and 30 mm) to absorb movements.
If you don’t want surprises in the future! yes or yes, put expansion joints to prevent the floor from lifting or cracking
For floors with surfaces over 20 m2 or more than 10 m linear, I recommend making partition joints, delimiting panels, with joints of about 6 mm.
3. Mix with the indicated amount of water
First, at this point, we will need three buckets; one for water and two for mixing so we don’t interrupt the pouring.
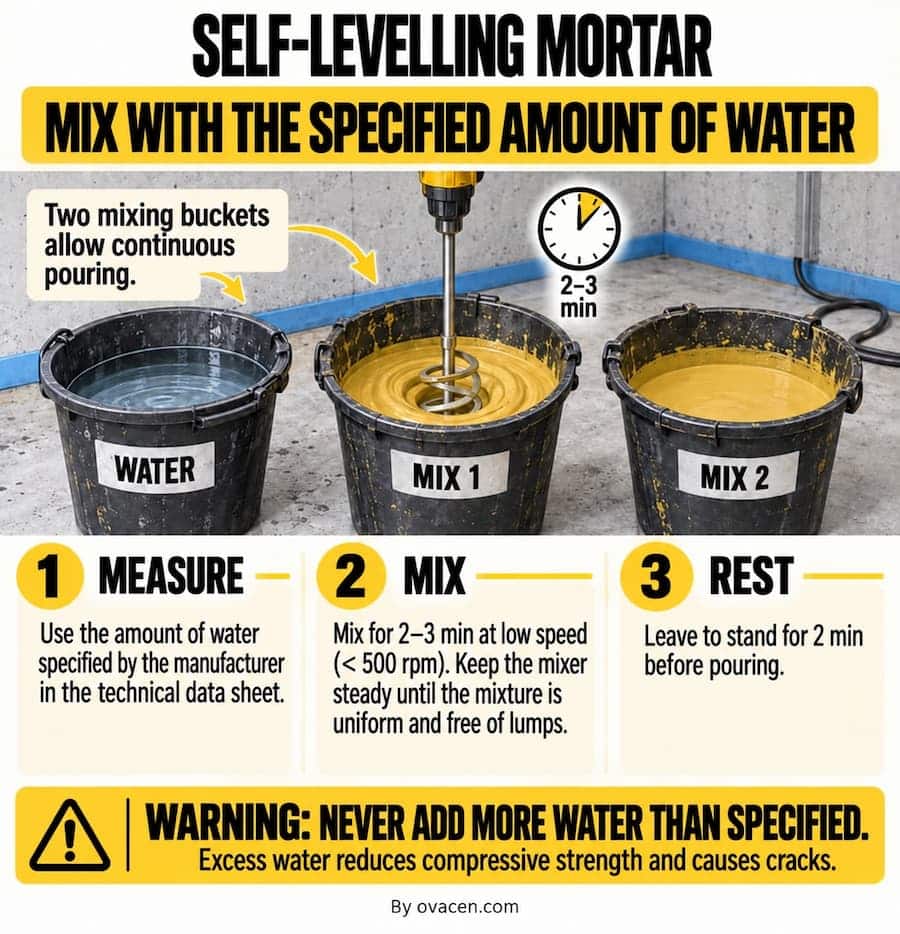
- For the mix with water, follow the manufacturer’s instructions for proportions, don’t invent very important!
- Mix carefully and without moving the mixer for about 2 – 3 minutes at low speed (< 500 rpm) until obtaining a homogeneous paste without lumps.
- Let it rest for 2 minutes.
⚠️ Please! Never add more water than indicated in the technical sheet. Excess water reduces compressive strength and causes cracks
4. Pour and spread
Work with a team of operators for medium or large rooms, a minimum of 3 to 5 people arranged in a chain is needed:
- Two people constantly mixing the bags with water respecting the exact proportion of the manufacturer.
- One person transporting the mixing buckets.
- One or two people pouring, controlling the thickness with the screed, and passing the spiked roller.
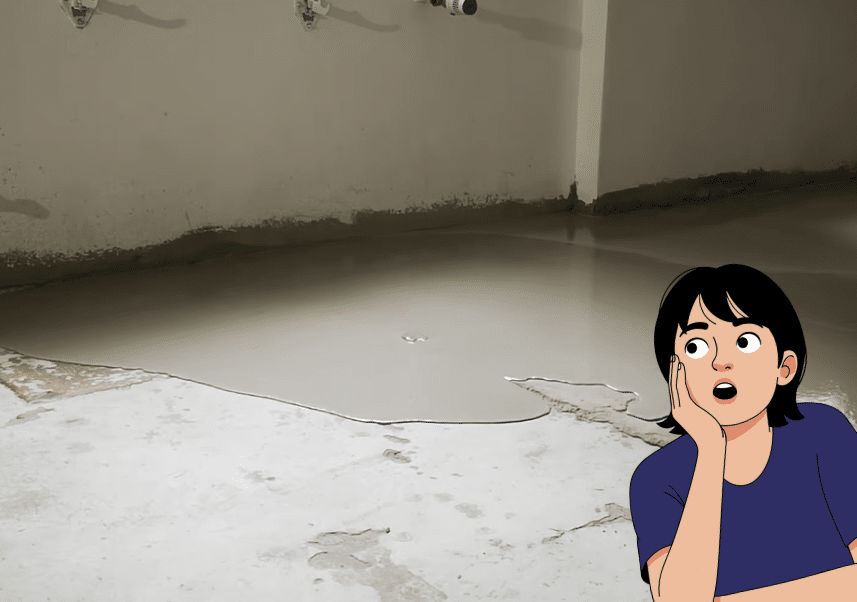
Look at the following image of the mistake we made on a site for not having enough operators and the pouring flow is interrupted; it is seen that the mixture does not fuse well or “surface waves” appear…
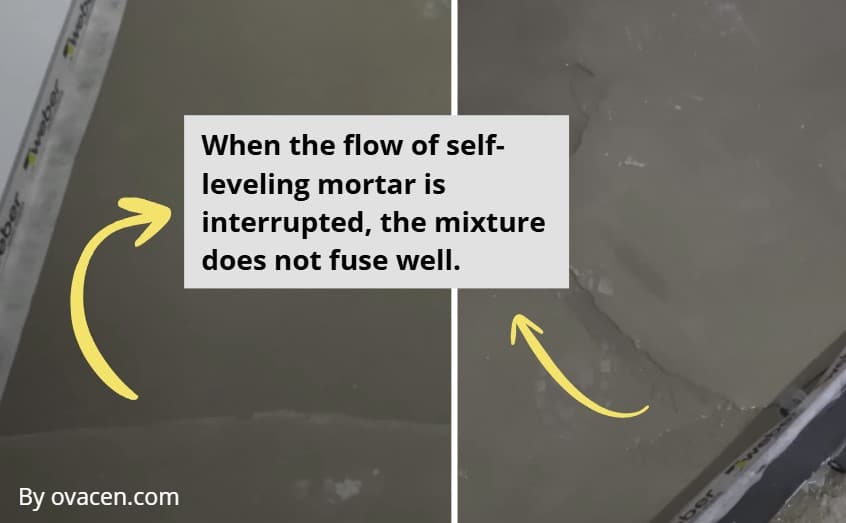
If the pouring flow is interrupted, the previously applied areas will start to dry and will not fuse with the new mixture, creating the dreaded “surface waves”
The pouring of the self-leveling mortar must be fast and constant just as we would do in stamped concrete, follow the following steps without stopping until finishing the room:
- Confirm that the base support is 100% clean and dry. Also, avoid drafts.
- Pour continuously from the farthest point towards the exit and quickly, between different mixes it must be fast not to leave visible joints.
- Spread with a leveling screed (screed).
- Respect structural and fractionation expansion joints (max. 6×6 m indoors).
5.- Deaeration
- Pass the spiked roller in two directions (crossed) in the first 10 minutes after pouring. This eliminates bubbles and promotes leveling.
6. Protect and check when it can be coated
Drafts are also the enemy in application and the first hours of drying (close all doors and windows). Drafts accelerate the drying of the top layer, creating a thin film or “cream” that wrinkles and damages the aesthetic finish. The steps are:
- Protect from drafts and direct sun for 24 h.
- Optimal temperature: 15 – 25 °C.
- The waiting time before placing the final coating must be when the mortar is completely dry (For example for a SikaFloor the residual moisture is <3%) and ideally verify the manufacturer’s instructions.
Before placing the finish, two points to remember:
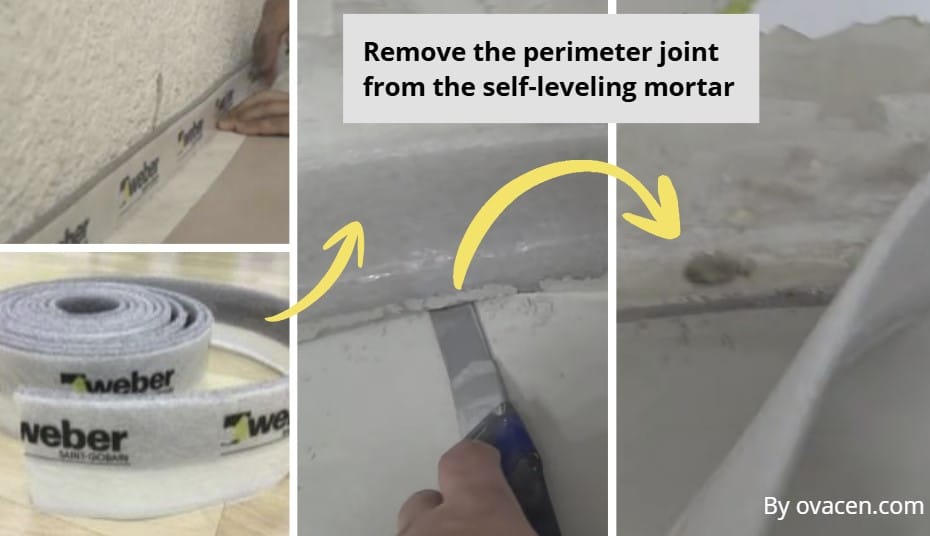
- Cut the perimeter expansion joint flush with the floor to the wall and pillars with a cutter if we don’t need it for the final finish
- Check the humidity conditions and the waiting time indicated for the product used. The pedestrian transit period and the period for coating are different checks, don’t confuse them!
Common mistakes
- Not priming the support: causes water loss, bubbles, and poor adhesion.
- Adding extra water to “facilitate” spreading: reduces resistance and increases shrinkage.
- Applying on a wet support (CT) or where we have drafts: generates efflorescence and flaking.
- Not respecting expansion joints: tensions break the layer into irregular plates.
- Pouring over turned-on underfloor heating: accelerates setting and cracks. Turn off 48 h before and after.
- Stepping on it too soon: leaves a permanent mark.
- Forgetting the spiked roller: the surface remains with craters from air bubbles and they need to be broken
- Not reading the instructions: You must read the manufacturer’s instructions before starting – especially with new products hitting the market.
Frequently asked questions
Does self-leveling mortar spread by itself?
The fluidity of self-leveling mortar allows it to spread by gravity, but during application, the material must be distributed and the thickness controlled with a leveling tool or screed.
What is the difference between a thin layer and screed mortar?
The difference between thin layer and screed mortar is in the thickness the product admits and the task we want to solve. The thin layer is used to regularize small imperfections, and screed products allow for greater thickness.
How many bags of self-leveling mortar are needed for a room?
The amount of leveling paste depends on the surface, average thickness, and consumption of the chosen mortar. Multiply these three values to obtain the necessary kilos and divide the result by the weight of the bag.
Can self-leveling mortar be used with underfloor heating?
Yes, self-leveling cement can be placed over underfloor heating, but a compatible product must be chosen by verifying the technical sheet and reviewing the system conditions.
When can a final pavement be placed over the self-leveling mortar?
The waiting time, applied thickness, and required moisture for the coating must be checked. Review the indications of the mortar, the pavement, and the adhesive before considering the preparation finished.
Can I add more water to the self-leveling mortar to spread better?
You cannot add more water than indicated in the self-leveling mortar’s technical sheet. Excess reduces resistance and can cause cracks.
Is it necessary to apply self-leveling mortar by professionals?
The application of self-leveling floors on small surfaces is simple if we have the tools and the support prepared. For medium rooms, large surfaces, or tasks where it is difficult to maintain continuous pouring, operators must be organized and professional intervention considered.