
Conversion from PDF plan to BIM (Revit) or IFC with AI
There are quite interesting options to go from a PDF plan to BIM (Revit) or IFC format in a very short time, and without having to enter AutoCAD which is already a lot!
Remember that to convert a PDF to BIM – normally – you use AutoCAD with the PDFIMPORT command, then decompose, scale…etc. A quick solution to all this is the Amplify application which is in beta and free or WiseBIM AI.
We start with the first one, the AmpliFy application is part of the iFy suite. It is a set of tools developed by INEX BET to accelerate and optimize work in technical drawings.
This tool with AI for architecture can not only convert a PDF to Revit with AI, it has more interesting options:
- Instantly converts a PDF file to BIM with AI (Building Information Modeling).
- We also have the possibility of converting PDF plans to IFC for download.
- Compare two plans in PDF format.
- Merge multiple IFC (Industry Foundation Classes) files into one.
If we add to all this that it is a free tool, fast in modeling plans to BIM, easy to use and with view filters, well, it’s not bad at all.
Is the tool perfect? The detection of geometry depends on how the PDF was exported. If the result of the distribution plans is not optimal, the problem could be that the PDF needs to be “cleaned” before uploading.
As you will see in the following video, the more complex the elements – dimensions, furniture, installations, etc. – within the plan, the more likely it is to throw errors (Remember it is in beta).
The conversion software interprets and works only with architectural plans
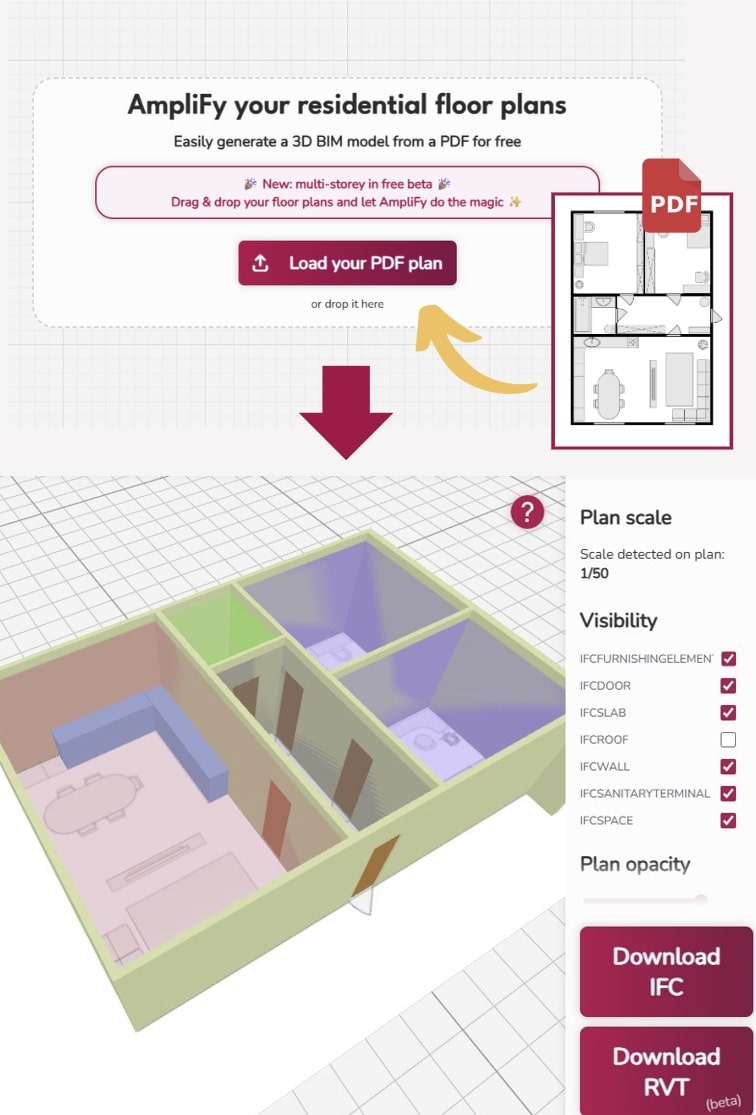
How to use the tool to convert from pdf to DWG for free? First enter the Amplify application from HERE. And then follow the steps of:
- Upload the PDF: Upload a PDF file containing the architectural plan of a residential project.
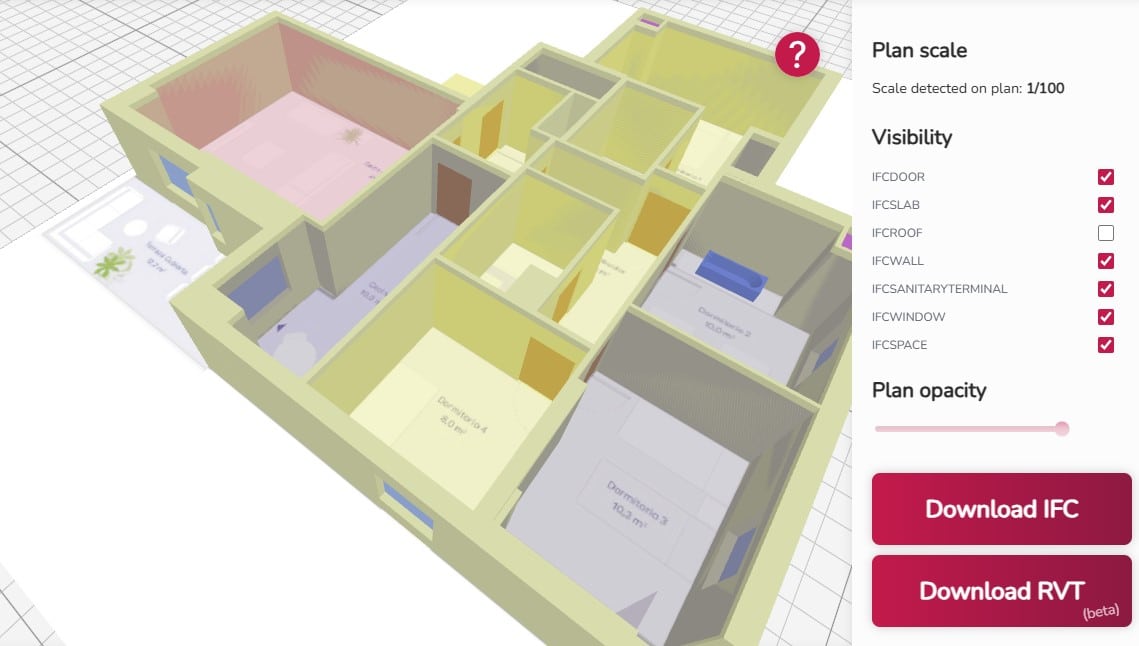
- Detection and Analysis: The application automatically detects the scale of the plan, and a Machine Learning model analyzes the key elements (walls, doors, windows, etc.).
- Generation of the BIM Model: Automatically, the tool transforms the analyzed data to generate a 3D digital BIM model in IFC and RVT (Revit) formats.
- Download and Use: Download the 3D model files to import them into your usual BIM tools.
[article ids=”44429″]
Some things to look at, for example, when uploading a plan, the tool detects the scale automatically but check it! Maximum file upload of up to 20 megabytes. Certainly, they have made it easy for us to use this PDF to BIM or IFC model conversion software and it is appreciated!
The second application is the plugin WiseBIM AI from HERE that helps you transform images, PDFs or cats to Revit. The problem is that it is paid, but it all depends on your needs. I directly leave you the video to understand its potential:
These tools with artificial intelligence to transform PDFs to BIM may not be perfect but they will save you time!
🟧 Note: Of interest is the article on how to render with Revit with AI or you can train in BIM and Revit with the following free courses currently there are 13!
Also, in the following video you can traditionally visualize how to convert your PDF plans to CAD and Revit in minutes and through Autocad. How to convert a PDF plan to Revit? The steps to follow are:
Preparation of the File in the System
- 1. Create the Project folder: A folder must be created with the name of the project and all the information to be worked on must be attached there, whether to go to AutoCAD or from AutoCAD to Revit.
Phase 1: Import and Scale in AutoCAD
- 2. Start a new project in AutoCAD: Open AutoCAD and start a new project where the information will be loaded.
- 3. Import the PDF: Use the
PDF importcommand to bring the file into the current drawing. - 4. Select the file and the page: Choose the PDF file and the corresponding sheet or page (for example, the architectural plan).
- 5. Load and decompose: Once the information has been brought into AutoCAD, it must be decomposed (if necessary) to work with the lines.
- 6. Verify the dimensions: Verify what dimensions the elements have using the dimension tool. If the verified measurement does not match the actual measurement it should have, it is necessary to scale the plan.
- 7. Correctly scale the plan: This is a crucial step if the dimensions are incorrect. (Perform the scaling process, usually with the *Scale* command with the *Reference* option).
Phase 2: Cleaning the CAD File for Revit
- 9. Open the model in Revit: Open a Revit model (an architectural, structural, or site model) and choose the appropriate template (e.g., architectural template).
- 10. Determine the necessary information: Ask yourself what information is needed at that specific level of Revit (generally, only the architectural plan).
- 11. Clean the CAD file (Create Disk Block): In AutoCAD, use the
bloquedisccommand. - 12. Select only the architectural plan information (the one you want to take to Revit), making sure to select in both directions to avoid leaving any layer unselected.
- 13. Save the clean file: Choose a location (the project folder) and save the new AutoCAD file that contains only the plan (e.g., “architectural plan”).
Phase 3: Final Import in Revit
- 14. Import to Revit: Locate yourself in the view of the corresponding level (e.g., Level 1). Access the Insert tab and select Import CAD.
- 15. Configure import options:
- Choose the clean architectural plan file.
- Select that the plan only be seen in the current view (to avoid it appearing in 3D).
- Configure so that the colors are maintained, all information is imported, and the units are meters.
- Select to correct lines that are slightly off-axis.
- Choose the manual and center position.
- 16. Position and lock: Manually position the plan. After locating the plan, **lock it** (
pin) to prevent it from being accidentally deleted. - 17. Save the Revit project: Save the information in the project folder (save as project). When saving, configure the options to save only one copy (place “1” in options).
If you liked the article, rate and share!